PROBLEM SOLVED – Google and Bing not seeing my move to HTTPS

Please refer to my two previous posts. I have solved the problem with a cached HTTP page showing up on search results for my site/blog.

I simply added a new “Static Home Page” to my WordPress Blog. Now the first result in both Google and Bing goes to the new (HTTPS) Home Page.

There are some good tutorials on YouTube on how to add a Static Home Page and WordPress makes the process simple. I then installed a widget called “Recent Posts Extended” to appear on the first (Home) page. This widget has a large number of options to vary the appearance.

Thankyou YouTube and WordPress.

UPDATE to “Google and Bing Not Seeing My Move To HTTPS”.

Please refer to my previous post. It has now been 4 days since I inserted the “site map” and this is what has happened:

When I search for whysun.com and / or Whycal’s Blog the first result is the old “HTTP” Home Page. However, my “About” page as well as the July post for “Google and Bing Not Seeing My Move To HTTPS” plus a number of (but not all) individual topic headings come up as HTTPS.

But, it just so happens that I was listening to the latest Episode (No 674) of the Security Now Podcast and the hosts were discussing this subject or more particularly the move by Google Chrome to start flagging non HTTPS sites as not secure. Starting at about the 52 minute mark, Steve Gibson explained that, where the search terms do not specify HTTPS, the default is to display the HTTP page.

So that would mean, with my site, as long as there is a cached HTTP version of the Home Page somewhere in the search chain, the HTTP version will continue to be returned until any cached versions are removed. This appears to be what is happening.

Version 68 of Chrome will start flagging non-HTTPS sites as unsecure, but the default will continue to be to display the HTTP version first.

I had version 67 of Chrome so I updated to 68.

The co-host Jason Howell said the he uses a Chrome Extension called HTTPS EVERYWHERE that looks for HTTPS first. You can get HTTPS EVERYEHERE from the Chrome Web Store.

I went ahead and installed this extension, but it made no difference.

Consequently, I decided to use the Google “Remove Outdated Content” tool to ask it to remove “http”. I will wait and see what happens now.

Some minutes later this request was declined with a number of generic reasons listed including things like “already removed” and “duplicate request” etc.. But the one that caught my eye was “The content you submitted for cache removal appears on a third-party page.”

Numerous Google searches suggested that the “third party” would more than likely be  WordPress and/or GoDaddy and there is supposed to be a “clear cache” option in both.

I have informed Google and Bing search, cleared my Browsers and flushed the DNS cache on my computer, altered all of the links in WordPress and the GoDaddy WordPress Application  (see previous post for details) plus the link in Open Live Writer that I use to write these blog posts.

Therefore, the problem is almost certain to be with caching of the home page by either WordPress or GoDaddy. I logged into my WordPress Admin but the only “Clear Cache” I could find was in Google Analytics and clearing this did not solve the problem. Same with GoDaddy C Panel,  I could not find a way to clear any cache.

So, it looks like I will have to live with the problem until it fixes itself.

GOOGLE AND BING NOT SEEING MY MOVE TO HTTPS

A month ago I purchased an SSL Certificate for my website/WordPress Blog. However when I search for whysun.com or Whycal’s Blog I still get sent to the old HTTP address.

The actual purchase and implementation via GoDaddy and their C Panel was simple and a check by typing the new URL into the address bar confirmed that it activated immediately.

However using the search bar continued to bring up the old HTTP site.

I recall reading that it can take between 4 days to 4 weeks for Google and Bing “crawlers” to index the change. So after about a month I thought I would look into it further.

As a first step I logged into the Admin of my WordPress blog and under Settings / General I noted that the change to HTTPS had to be altered manually in the sections for

  •   WordPress URL, and
  • Site Address URL

Then I went to my GoDaddy C Panel  and under Web Applications / WordPress /My Applications / View Edit Details (wrench icon) /Files and Tables, I  found again that I had to manually amend the box for “Location URL”. (Don’t forget to click “Save All” which is hidden right at the bottom of the page.)

I checked every day for a week or so and there was still no change when using the search bar at least for the home page. Although my “About” page plus a number of individual posts show HTTPS.

A Google search for a solution turns up a number of suggestions but most involve actions in areas that I don’t fully understand so I decided to continue to wait.

However I ran across this YouTube video

https://www.youtube.com/watch?v=-Ulj7DBMyGo

The author “Jakson” suggests a very simple solution using a WordPress plugin to insert an XML Sitemap.

This is a very well made video and no further comment is needed. I have installed my sitemap so I will check daily to see if it works and report back.


Win 10 Photos–continued

The Win 10 Photos App has improved to such an extent that it is my first option for  editing of images. Although I have Photoshop Elements, I use the Photos App more frequently particularly when I want to make quick adjustments or save a still image from a video or an iPhone “Live” photo.

The App lets you drag through the video or “Live” photo to select the desired frame to save.

Note:  It saves the still image as a .jpg  in the same folder called “original name + moments”

Another very handy edit is the “Enhance your photo” function that quickly and automatically corrects light and colour with a vertical line that can be dragged left or right to make further manual adjustments.


There are many more manual adjustments that can be made, but I find that the automatic “Enhance” function does all that I ever need.

Be aware that with the “Crop” function you have to click on “Aspect ratio” and select “Custom” as the default maintains the original aspect ratio.

This App is probably all most people will need and the automatic “Enhance” is a life saver for me as I am hopeless with manual adjustments to photos.

Win 10 Photo App – Create Slide Show


I have now experimented with the “Create – Story Remix” function in the Win 10 Photos App and, while it is far from a substitute for Movie Maker, it is very good for what it is. I compared it with the Slideshow function in Photoshop Elements and, in my opinion, the Win 10 App does a better job.

These are a few tips and comments:

I recommend that, before starting a project, you copy the photos you want to use into a separate folder. (See comments under “Photoshop Elements Slideshow” at the end about lack of flexibility with sorting for Photoshop Elements Slideshow.)

This is not essential and in fact one of the benefits of the Win 10 App is the enhanced search function that enables easy selection of photos of a particular person, place or thing. For example, if you have taken a whole lot of photos at a birthday party but you want to create a slide show using only photos containing the birthday girl/boy, then this function will do this for you by selecting that person in the original search or later as the “star” in the movie/slideshow.

However, if like me, you have photos scattered all over multiple drives and folders as well as One Drive, it makes it easier to first copy the photos you want to use to a new separate folder. Also, unlike Movie Maker and other similar programs, you can’t save a “project”. Even with 16GB of RAM in my computer, both the Photos App and Photoshop Elements Slideshow crashed, and the hardest part of the process is the selection of the photos. You can delete the folder of copied photos after the job is completed.

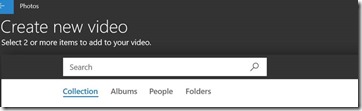
To start a project first open the App and click on the “Create” button – top right:

When you click on “Create” the drop down gives 3 options:

  1. “Automatic Video with Music”,
  2. “Custom Video with Music” and
  3. “Album”.

On this window there is also a “Search” box and if you click inside it, it brings up choices like “People” with head shots, “Places” and “Things”. My computer is such a mess it is far easier to copy the photos wanted for the project into a folder on say the desktop. If you wanted photos of a particular person or place for a special occasion, the search function may help. I tried the search and it seems to miss a lot, but then it might help if I had saved all photos inside “Picture” folders that are included in the Pictures Library.

For the test, I first copied the photos and 1 video clip I wanted to use to a folder on the Desktop so when I clicked “Create” / “Automatic Video with Music”, I could easily navigate to that folder by clicking on “Folders” in the top right menu under “Search”.

As I said, selecting the photos can be the most time-consuming part of the process and first copying to a special folder makes this easier particularly if you have to start over where there is no option to save the project.

That is the end of the “hard” part. The rest is simple, apart from the annoyance of having to select each individual photo as there is no “select all” option.

You have the choice to sort only by oldest or newest but if they are not in the right order you can fix this later – see below.

Click “create” again and it prompts you to name your slide show then proceeds to generate the video. At this point you get further options to make edits including a remix with a different theme and music. You can also nominate a “star” from a line of head shots of the people it can identify – or leave it at the default of “no star”.

I experimented with the “Star” function and, if left at the default “no star”, it included all 17 photos and one video that I had originally selected. It adjusts the length and therefore the duration of an individual image in accordance with the length and beat of the music track in a particular “Theme”. (This includes the duration of the video clip). Themes can be chosen from a variety of options and it was when I was frequently changing themes to look at all of them that both Photos App and Photoshop Elements Slideshow crashed and I had to start over.

When I clicked on a particular “star” out of the four individuals it could identify, it eliminated any photo of people not including the Star but left in all other photos not containing any people plus the video clip that did not contain the “star”. It left out a couple group shots that did contain the star but, to be fair, it was a bit hard to ID the “star” in these photos and the video was not the best quality.

It is not perfect but more than adequate to quickly put together a slide show.

Also, it inserts the “Title” (the name that you gave earlier) over the top of about the 3rd photo with the font and presentation determined by the theme.

However, there is an “EDIT” button that opens a time line/storyboard with more options.

Access to a “Storyboard” contains the full range of options that are available if you had chosen the “Custom Video with Music” option at the outset. This includes inserting additional photos and video and changing the position/order by dragging images plus adjusting the duration of individual photos.

A top menu opens,

This facilitates a number of edits including the ability to change and/or use your own music :


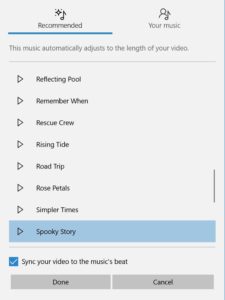
Other edits can be accessed in the Storyboard menu:

An interesting point about the “Duration” is that, by default, the duration of each image is timed in accordance with the beat of the music, so if you change it for one image it adjusts the rest to keep them all to the beat and the overall length of the video the same. However, you can undo this connection by clicking on the Music icon in the top menu and un-ticking the option to “Sync your video to the music’s beat”. Then, if you increase the duration of one image, it does not alter the duration of the other images and increases the overall length of the video. The generic type music just keeps playing for however long the video is.

I also noted that when I added photos to the storyline before the image with the title text overlay, it kept the text over the same image, but this is easily fixed by going to that image and using the Text option to delete the text and put where you want it.

With the 3D options there is a variety of effects that can be inserted over any image or part of a video and you can adjust the duration as well as volume of the sound.

One issue with video is that you can’t temporarily adjust the volume of the theme music to lower while a video clip is playing to hear the audio track of that clip. You can adjust the volume of the theme music but it then applies to the whole presentation, not just for the duration of the video clip. The volume of a particular video clip can be adjusted but I found that, more often than not, the music drowned out the video clip sound. If you want to hear the sound track of an individual video clip, you have to turn down the music volume for the whole presentation.

If at the beginning, you had chosen “Custom Video with Music” you are taken straight to the screen you arrive at when you click the Edit button in Automatic and as such you don’t get a “Star” option. If you want the “Star” utility, just go first to “Automatic” and then progress to “Custom” via the “Edit” function.

When you are finished, click “Export or Share”:

This is self explanatory with file sizes (and resolutions) varying from small to large.

Overall this is a handy program for producing quick but good quality short slide shows and/or videos with plenty of edit options to personalise your project.

It is not, however, a substitute for a full movie making program. I tried to join two large video files and it would not work. There must be a size limit.

I compared the Windows App to Photoshop Elements / Slideshow.

Photoshop Elements Slideshow

Photoshop Elements Slideshow (PES) produces a more professional looking video. It automatically inserts a border around the images and presents in a more animated way against a set background that changes with the various themes. But it has nowhere near as much editing flexibility. The duration of each image is short and cannot be changed and the size of each image is small.

You only have limited ability to sort the images and I had to first rename them all to get them in the order I wanted as, unlike the Win 10 App, there was no provision to later re-arrange the order.

Probably the worst aspect with PES is when you get to the “Export” phase. PES only provides a choice between 720p and 1080p resulting in giant files.

SUMMARY

You are given much more flexibility with the Win 10 Photos App including the 3D effects that can add “sparkle” to your video. Whilst the “motion”  of the images in the Win 10 Photos App was not as lively as the PES version, I considered this to be an advantage as each image is presented in a larger format and, with the ability to fully adjust duration, the Photos App is far better for actually looking at the images. They are smaller and flash by in PES.

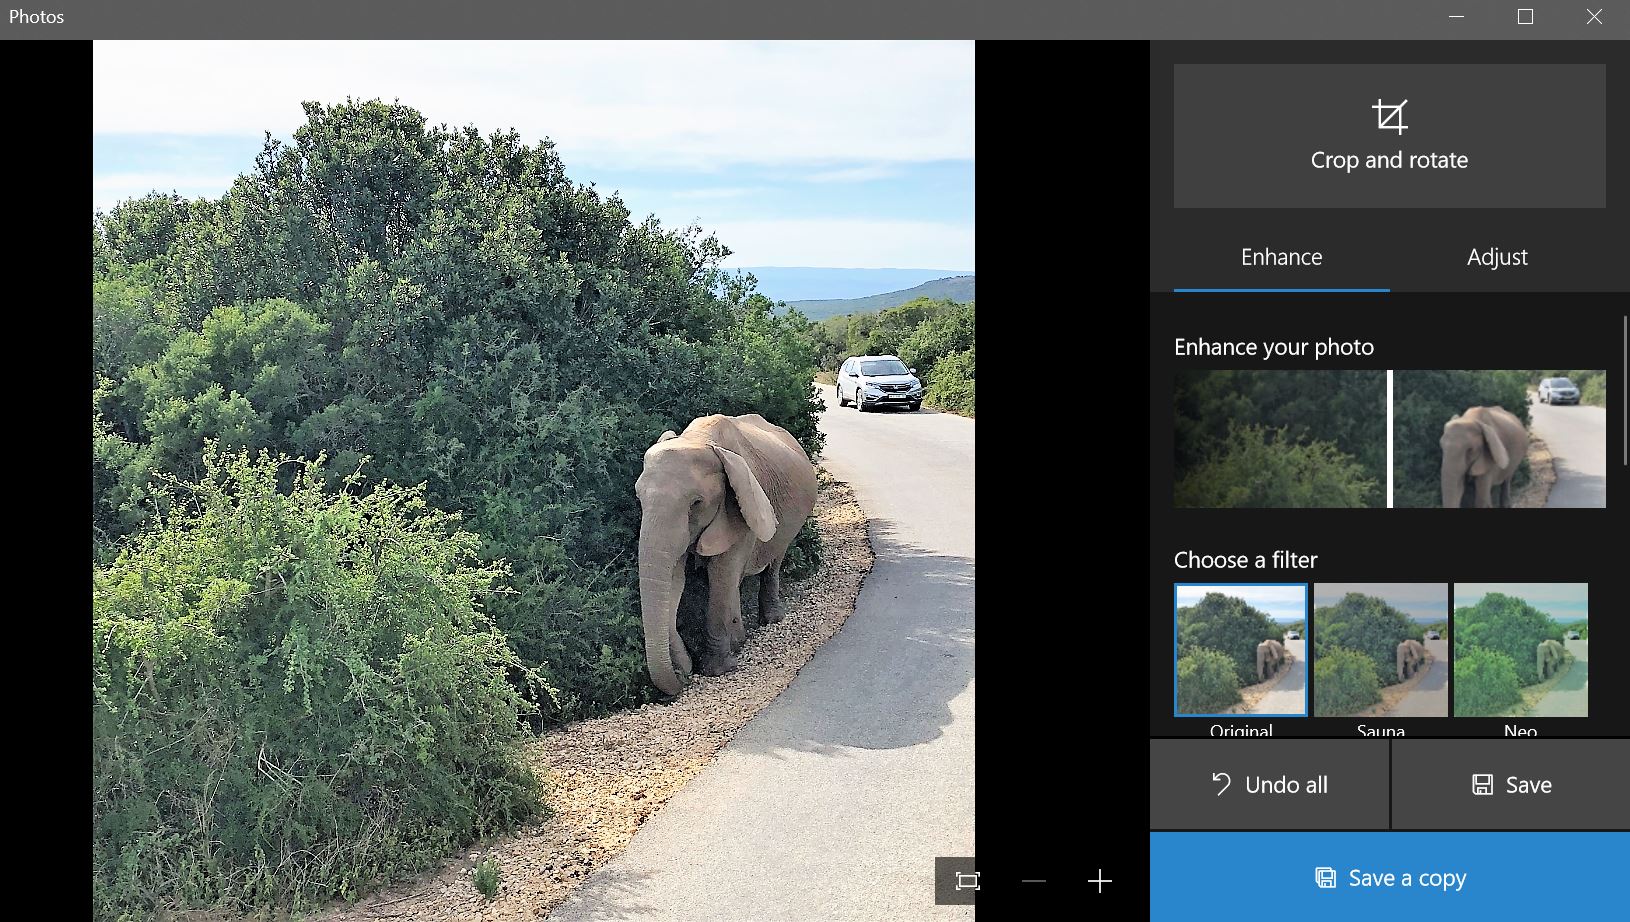
The only real negative with the Win 10 App is the lack of a background. This means that apart from the few images that actually fill the screen, there are black bars at the sides of most images. Win 10 Photos does have a “Resize” button with a “Remove Black Bar”, but it just enlarges the image to fill the screen cutting out most of the photo.

Some minor things like a “Select All” when choosing images from a folder would be nice as would an ability to temporarily reduce the theme music to hear the sound in an individual video clip.  A “save project” would be handy but, as I said, first setting up a special folder with copies of the images and video that you want to use takes away most of the pain in the event of a crash and/or a re-do of your project.

The Win 10 App is easier to use and, in my opinion, the better program. To be fair, Photoshop is supposed to be for photos and to make movies there is Premiere.

Adobe Premiere is probably a bit too much for most people and if, or until, Microsoft makes a Win 10 replacement for Movie Maker, the Photos App will probably satisfy the needs for many casual users who just want to make a quick slide show or short video with little effort.

Failing that, if you have a Mac, Apple still includes its “feature rich and excellent” iMovie as part of the deal.


iTunes now in Microsoft Store

iTunes is now in the Microsoft Store and I have installed it to replace the existing iTunes program. Installation was straightforward and it automatically uninstalls the older version and, as far as I can see, transports over all settings and content. This included automatically retaining and linking to my iTunes library that I have installed on a different drive.

When I attached my iPod Nano to update the podcasts, a notification popped up advising that iPod software needed to be installed and, once again, it did this automatically. The size of the App was 213mb and the iPod software 32mb. (Care a UAC screen came up for both but with the iPod software it was hidden under the iTunes window. I wondered why the installation had stalled and it took a couple seconds before I noticed the UAC icon flashing in the Task Bar.)

Of course, there is no obligation to do this but I have adopted a policy to get everything I can from the store. This is because of the increasing problem of getting unwanted extras with many free programs particularly from file download sites.

I am regularly asked by my friends to “fix” their computers and, more often than not, the problems are caused by unwanted search engines, toolbars, trial anti virus programs etc., which can only have been installed along with some other wanted free program. Most, if not all of these unasked for “extras” open at start up and generally slow down the computer and are extremely difficult to remove.

Consequently, I have adopted a policy to first look in the store and, if not successful,  then to go to the original source to get the program. I will no longer go to any third party download site. I am also prepared to pay for programs and Apps.

I do this both for Windows and Mac but unfortunately the Microsoft Store is not yet as good as the Apple store.  Furthermore, I have found programs in the Microsoft store that don’t work. For example, when I tried the store for a program to unzip .7z files the programs available did not work. In that case, I then went to the 7-Zip site. I also always look at the reviews but at least with a store App, if it doesn’t work it can be easily uninstalled without any damage to the computer.

However the Microsoft Store is slowly improving and I now have good useful Apps like Adobe Photoshop Elements, Paint.net and  iTunes from the Microsoft Store.

For everything else I go to the original site for the download and, even then, I am very careful.

iCloud and Cortana

I have noticed that if you have iCloud installed and you use voice to ask Cortana to open Mail / Calendar etc, Cortana will open the iCloud app rather than the Win 10 app even when the Win 10 app is set as the default.

When you uninstall iCloud, things return to normal.

Even if you leave the “Mail,Contacts, Calendar and Tasks” box unticked, the problem  persists.

icl

Recently I installed iCloud on my Surface Pro 4 (SP4). I really do not have any use for iCloud other than as a back up for my iPhone (excluding pictures). A back up on iCloud makes it very easy to get all of your stuff onto a new iPhone. I don’t use it for backing up pictures as you don’t get much free space and I don’t want to pay for iCloud storage when I have more than enough on One Drive courtesy of my Office 365 subscription.

However, every time there is an update to iTunes, you get prompted to install iCloud. Thinking that it could not do any harm, I weakened and installed it.

I got the answer to the ‘could not do any harm’ thought when I asked Cortana to open my (default Win 10)  Mail App, but instead,  Cortana tried to open the iCloud Mail App. Naturally, my first inclination was to blame Cortana and/or a recent update. However I asked Cortana to open other programs and she worked well apart from things like Calendar and Contacts which also just happen to be part of the iCloud App.

So I uninstalled iCloud and Cortana went back to opening the Win 10 apps just as I wanted.

Before uninstalling, I checked the list of default apps and this did not show any change from the Win 10 defaults. Also Cortana starts by indicating that these apps will be the ones to be opened but somehow the process changes and it attempts to go to the iCloud app even though I have never used any of these programs.

When you install  iCloud, there is an option to sync Mail, Contacts,Calendar and Tasks, but even if this is left unticked, the problem persists. To my untrained eye, it is difficult to attribute this to any attempt to get you to buy more space on iCloud and in fact it is hard to see any benefit to Apple so it more than likely is not deliberate. In my case Cortana voice command is far more important than iCloud – SO — so long iCloud!

ANOTHER UPGRADE

“Live and learn” or learning from experience and mistakes is certainly true.

As set out in recent previous posts, I upgraded my TV to a 4K HDR model and in turn this has opened up a whole learning experience particularly in regard to my existing Home Theatre equipment.

The first thing I discovered was that my AV Receiver – a Denon AVRX2000- would not pass through a HDR signal even though it handled 4K. Most probably a software update would fix this issue. However, the AVR X2000 is not only a “low end” model but is also now a few years old, so no updates are available.

Initially I got around this by connecting my PS4 Pro and my Xbox One S (both of which output 4K HDR) directly to 2 of the HDMI inputs on the TV. I used the ARC for the PS4 and a Digital Optical cable for X Box One S to get the sound to the Denon AV receiver. (I could not get ARC to work with the X Box One S.)

Then I discovered that only 2 of the 4 HDMI inputs on the TV would handle the full 4K HDR signal. With one of those inputs needed for ARC and the PS4 Pro connected to the other, that left the X Box One S connected to an input that would not handle HDR.

I then got “a bee in my bonnet” about the whole thing and subsequently discovered that both ARC and Digital Optical have limitations as well. By what I can gather from the internet and from observation of what the AV receiver was getting, both ARC and Digital Optical have bandwidth limitations that limit output to 5.1. The AV receiver then takes that signal and artificially upgrades it to deliver sound to the 7.1 speakers. When both gaming consoles are connected to the AV receiver via HDMI the full 7.1 signal is available but at the cost of HDR not being passed through to the TV.

AND YES I upgraded all of the HDMI cables to the latest 2.1 spec.

Therefore with only 2 X 4K HDR HDMI inputs on the TV and limitations with the AV receiver as well as with ARC and Optical Digital cable, I had to choose between a compromise with HDR or 7.1 sound.

I went to an electronics store and bought a HDMI splitter that said it was HDMI 2.1 and HDCP 2.2  compliant thinking that I would output the vision to the TV and sound to the AV receiver. But it wouldn’t work, just as the staff at the store warned me it wouldn’t.

So having more money than sense and with my obsession over-riding common sense, I bought a new AV receiver.

It is a Denon AVR-X1400-H. Everything now works as it should and I have forced to the back of mind that the money I saved with the EB Games special offer for the TV has been largely used up with this purchase – and various HDMI cables / HDMI splitters and time wasted etc..

Ah well , you can’t take it with you and I know someone who will appreciate getting my old AV receiver.

X BOX ONE S

In my previous post, I  forgot to mention how the X Box One S performs with 4K games.    

The short answer is that it performs very well. As well as playing 4K HDR Blu Ray discs, it also plays 4K/HDR games. As far as I can see, I can’t notice any difference between it and the PS4 Pro – although there probably is.

Also I found that the X Box has more information and adjustments in the settings. In fact, it was the X Box that alerted me to the fact that the Denon AVX 2000 would not pass through the HDR signal.

On the X Box One S go to – Settings / Display and sound /Video output / Advanced Video Settings /4K TV Details and it shows on a table what is happening with the 4K settings. Be sure to set the Display to “TV Resolution 4K” and under “Advanced video settings” set it to “TV Connection Auto Detect” and tick all of the boxes on the right. When the X Box was connected via HDMI to the AV receiver, the HDR box was disabled but connecting to the TV fixed this (with a Optical Digital cable used to deliver the sound to the AVX2000). Don’t forget to go into Audio Output (in the “Display and sound” X Box settings) and turn off HDMI audio output and select either Dolby or DTS for the Optical sound out.

At this stage, I probably won’t upgrade to the X Box One X.